OK, a quick review of previous posts shows that the clutch pedal is actually offset to the right. This was to avoid the transmission tunnel in the original MX5, and will do exactly the same job here. So I'll mark up the position of the master cylinders and drill holes to mount in the required position, but also retain the spacing that I had originally planned for.
I also need to weld on one more plate for the pedal brackets, this will sit parallel to the floor. Normally it's bolted to the floor, but there's zero strength in the floor. So in my case it'll be bolted to the frame. What I'm planning to do is cut out a section of the chassis and replace it with thicker steel. This will then be drilled and tapped to accept suitable fixings. I had thought of rivnut or similar captive nuts, but this will be inside the frame and amazingly fiddly to get to if they go rusty. So it's just easier to make it part of the frame itself. It also needs to be completely flush, which also removes the possibility of a rivnut.
Of course, I want to compare this plan with the original, just in case I've missed a trick here.
Sunday 31 December 2017
Saturday 30 December 2017
Some work (finally!)
I've been allocating an hour each day after the little one is in bed, to get into the garage and do stuff. The first couple of evenings have just been tidying (it's unbelievable how much stuff a garage will 'accumulate' when it's not in use!), but I've finally managed to get some welding done.
The bottom panel of the pedal box is now welded, although as expected it distorted whilst welding. In a way it worked in my favour though, when I bolt/clamp it in place it's absolutely rock solid. With a reinforcing plate across the top I think the pedals should be nice and firm.
And so, the next step. Welding the brackets for the pedals. I've got them out and wiped the dust off, and I remember what I had planned. I'm fairly sure on here there's also a drawing for the pedal layout, so I'll use that as reference.
Then I need to cut and mount the clutch and brake cylinders. The clutch cylinder will be new (the original was servo driven so won't be reused), but I'm thinking of using a new brake cylinder too depending on the price. Time to get shopping!
(Later that evening...)
Well, a new brake cylinder is out of the question, triple figures for the few that I can find. There are repair kits so I might try one of those if needs be. I've ordered a new clutch cylinder, car builder solutions has them for £40. The 0.7" apparently is not as common as the 0.75" (the latter being a Landrover common fit) so it's slightly more expensive. Still, it's ordered now, so I can get both master cylinders fitted when I do the pedals.
I also had another look at the manual, and it did occur to me that the clutch hole is where it is because it needs to stay away from the engine. Which means I may need to modify my drawing to be more in line with what they're suggesting. No biggie, just might be less space between the pedals than I had planned.
Time to go undo all the brake lines on the old cylinder, just to see what I'm working with...
Sunday 24 September 2017
More than a year...
Wow, I've just noticed it's been more than a year since I posted on here, and therefore even more than that since I worked on the car! The joys of having to go where the work is unfortunately, I haven't yet found a hotel where I can get some welding done in the evenings. Hmm, perhaps that would be a good business venture, a bit like a spa hotel but with spanners and stuff...
Anyhow, back to my car. Well, almost. Unfortunately the daily driver (A 2006 Saab) is suffering from a very rattly exhaust, probably either the front cat or the flexi pipe. Both units together are several hundred pounds to replace, and potentially a full day in an average exhaust builders. But it did get me thinking, what if I could make my own?
First job, learn how to weld stainless steel. This was easy enough, got some stainless MIG wire, turned up the settings as the interweb said, and then proceeded to blow seven shades of stainless through the plate I was practising with! Turns out the settings don't have to be that far off normal steel welding, and soon enough I was getting a good strong weld between stainless plates. I then also welded stainless to mild, because it did occur to me that the existing exhaust may not be stainless all the way, and I only want to replace the parts I need.
Now that I'm happy with stainless welding, I've bookmarked a catalytic converter, a length of pipe and a flexi. Total price just over £100 (with the cat being most of that!).
Next stage, figure out how to do the bends. Now the top of the cat turns a sharp 90+ degrees into the turbo, and I'm not confident I could get a sharp enough bend without compromising the diameter (not what I need straight out of the turbo!). So I found a thing on the internet called 'lobster cutting'. Basically you chop a piece of pipe into segments, each with a certain angle on them. Then if you rotate every other segment 180 degrees, you end up with a bend!
Just for an experiment, here is my first attempt at a lobster cut bend with some spare tube I had;
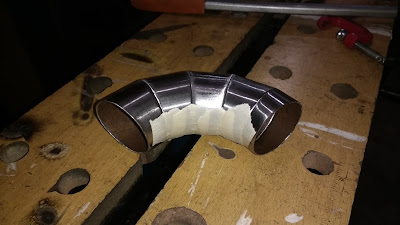
As you can see, it's just taped together, but I think it's actually turned out really nice. And it'll be more than enough to get the curve off the turbo into the cat.
Next week, I might get chance to work on the car...
Subscribe to:
Posts (Atom)