Sunday 14 January 2018

And cleaning...


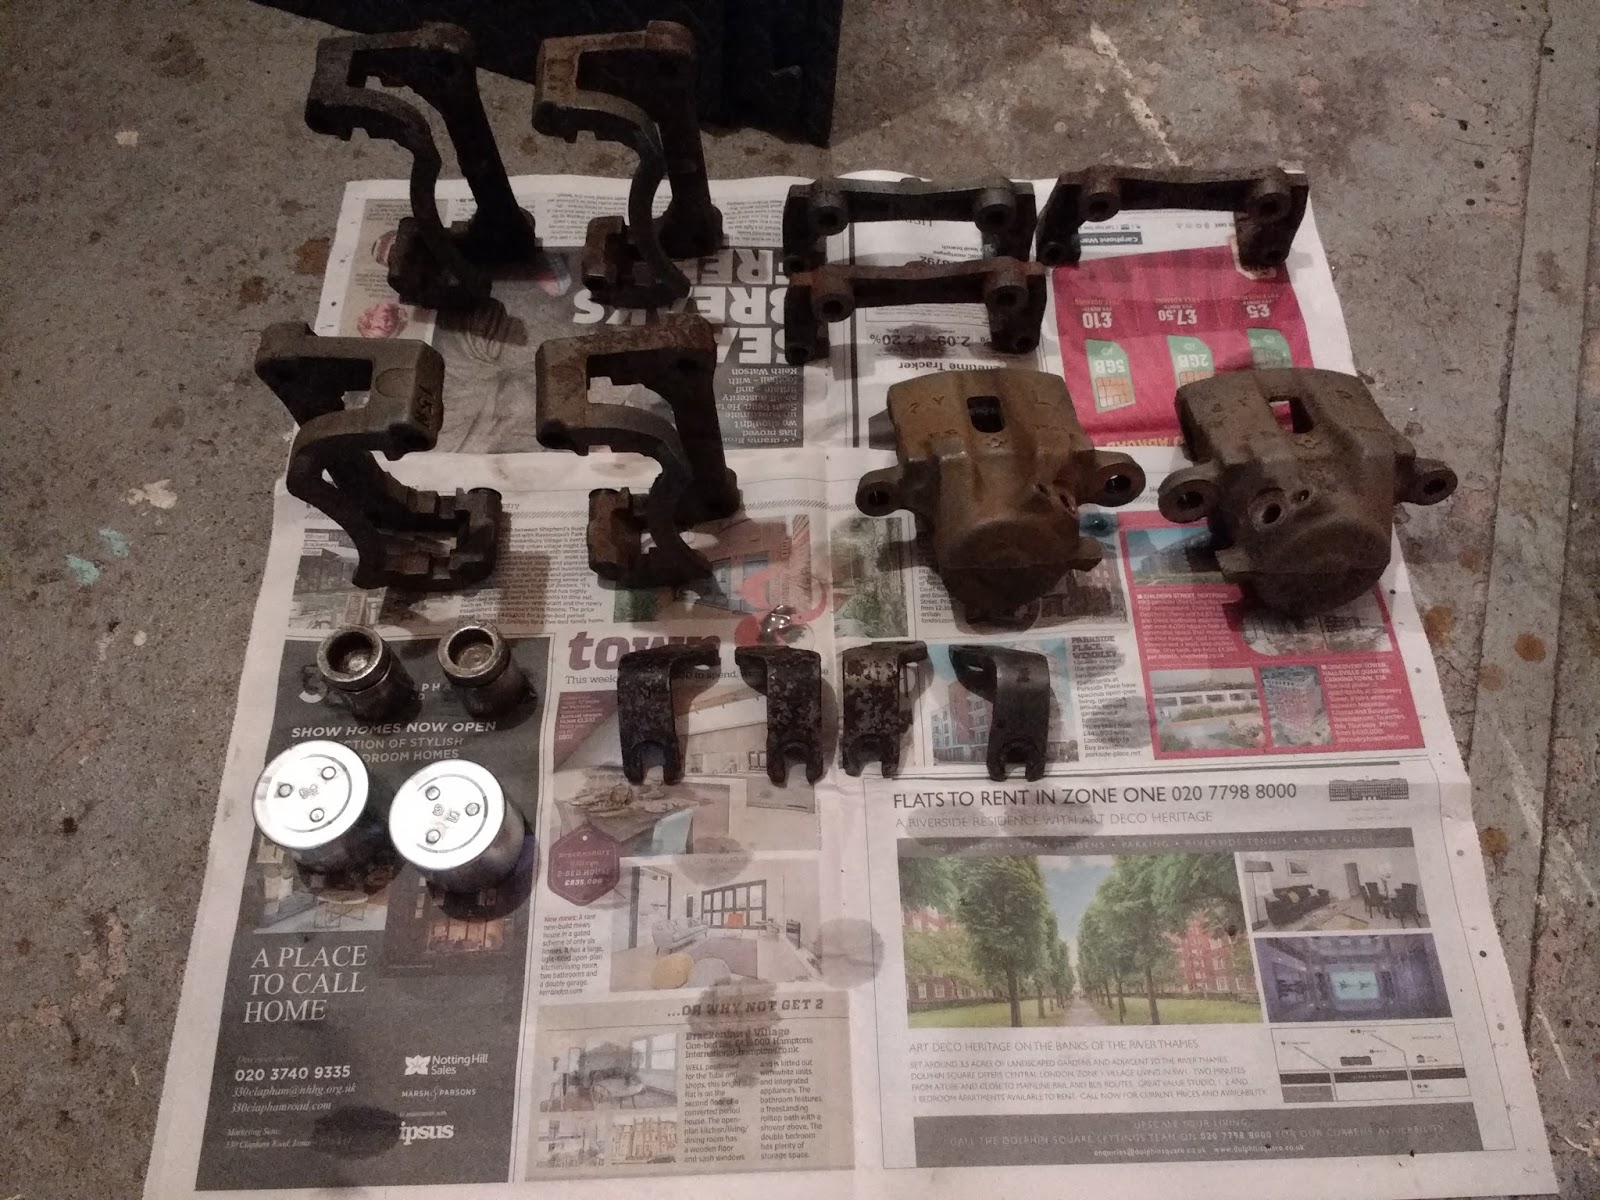
The cleaning is going well, although it's proper back breaking work!! This is the result of a weekends hard slog. Turns out the best stuff so far is the Deox-c that I had bought a while back. Whilst it doesn't seem to work immediately, what it does is loosen the rust so it can then be rubbed off with a green scouring pad (the washing up kind of pad). What was apparent though is that the bare metal very quickly gets a haze of rust almost as soon as it comes out of the solution. What I'll need to do is remove each part in turn, give it a scrub and dry then paint it.

In terms of other parts used, I've bought all new seals (£30 for all four corners), new bleed nipples (a fiver) but I'm going to reuse the sliders as they seem ok (apart from needing a clean as above). I also have new copper washers (no brainer for that one to be honest). I'll be reusing the various bolts as well, again they just need a good clean.

And the rears are a challenge. As I figured out, the pistons are screwed in, so it took the whole of two minutes to remove the pistons. Problem is, the bolt that screws them in also needs to come out (there's a seal that I think has perished on one), but it needs a circlip removing that is inside the caliper. I've ordered a pair of internal circlip pliers that I am hoping are narrow enough and long enough to get inside. Once they're out, I can replace the seal and check the handbrake mechanisms.

Apart from that, I seem to have lost a rear caliper bracket (but I still have three!), and I may have to replace the rear pistons as I'm not sure they are usable.

In other news, I am now the owner of an Escort Mark 2 steering rack, obtained for the princely sum of £40!! It looks almost brand new, it still has end caps on and protective paint on the threads, so I'm not even sure it's ever been mounted. I'm going to remove the bellows to peek inside, but if everything checks out I won't be doing much else to it. Oh, apart from finding some decent mounting brackets. I'm tempted to go for solid mounts, but I'm also thinking it might make the ride a bit harsh.

Sunday 7 January 2018

Cleaning...

One of the things I've yet to do is clean up the donor parts. In this case it's mainly the brakes. The ones that came off the car were definite MOT failures, but when I took them off I was hoping they'd clean up. Having said that, I also bought a complete extra set of brake calipers, discs and pads for £80, so I have double of everything.

And I needed it!! The first front caliper came apart quite easily (if a little mucky). I did the compressed air trick to shift the piston, and it came out with an almighty crack. I was off to a good start.

The second one I picked up was missing a dust seal, not good. Turned out the piston wasn't going anywhere, in or out. So I removed the sliders, carrier and other spare parts, and marked that one for the bin.

Third one wasn't much better, it had a dust seal but was ripped. So again I scavenged what I could and put the caliper aside. So that was a working left caliper, a failed right, a failed left.

Thankfully the last right hand caliper piston also came out quite easily, although the sliders didn't. Still, overnight soaking in plusgas should solve that one.

I'd made enough mess by this point so I stacked up the rear calipers ready to dismantle them sometime today. Then it's a good scrub and grind to get rid of the rubbish, followed by a coat of paint. The new front seals are on their way (£14 for both sides including slider boots).

By the way, for anyone using compressed air for removing pistons, heed the warning about them coming out with force. If there isn't anything to stop the piston coming out, they will end up flying. Fortunately the front caliper was big enough to contain the piston, however I can see the rear piston is small enough to shoot straight out. Leave a brake pad or flat metal in the caliper to stop it doing damage. And keep your fingers out of the way!

Next job after the calipers, removing the surface rust off the chassis and putting the first coat of oxide on it.

(A quick note to self... the rear pistons won't 'blow' out, they're fixed in with adjuster screws. In some ways that makes them easier to dismantle, although it still won't work if corrosion has set in. Anyhow, that's this weekends job).

Monday 1 January 2018

Fixed pedals and new holes

Quite a productive hour today;


The clutch pedal has been straightened and welded up so it sits in between the brake pedal and the transmission wall. The hole has been cut for the brake master cylinder, and I've positioned the gas pedal for fitting tomorrow. 

The gas pedal should be even easier than I expected;


Basically I need to make two brackets off the cross member to hold the spring where I've clamped it. It did occur to me that the cable mount is at an odd angle, but it can be quite easily bent to shape. 

The clutch master cylinder is on order, so I'll wait for it to appear before cutting the clutch holes. Then I need to make stops for all three pedals. Bent pieces of metal work for the manual, so I'll do the same!!

Then I need to figure out how to bolt the entire unit to the chassis, shouldn't be too difficult but I want to make sure it's reinforced. 

Two down, one to go (ish)


Well, there you go. Two pedals mounted on the back plate...

So a few things spring to mind. The plates were a good choice, the thing is rock solid. If I can finish the top and bottom bolts then there will be no flex at all. On the flip side, the welding was awful. Good penetration (pretty patterns showing through the other side), but so ugly it needs cleaning up.

But the main issue is the clutch pedal. I had hoped to retain the angle of the arm to keep the master cylinder out of the way of the engine. But having it in the right place actually has the two MC's in the same place. So I had to move the pedal 20mm to the left, which means the foot plate itself is right against the side of the foot well. Unless I want to spend all my time pressing the clutch with the side of my foot, it needs to be moved.

Tomorrow I'll cut off the plate (again!!) and reweld it in a better place.

But thankfully the brake pedal sits underneath the steering column absolutely perfectly, so I'm well happy with that. And plenty of space for the gas pedal, which will hang from above.

Hmmm, I need a shoe to measure...

Here's to getting the car finished this year! Well, at least moving under it's own steam, actually getting it finished is in the hands of VOSA and DVLA so that could be any time!