Saturday 26 June 2021

To sit or not to sit

 I've still got a fair bit to do, but a big chunk that can be done next is the seats themselves. I've already got the fixing points for the runners, so I had it all planned to reuse the donor seats. A while back I dismantled a seat base and it came apart as a metal shell, a sponge block and the leather skin. This looked good, modifying the metal base and reducing the foam would work. Unfortunately, today changed that plan...

It turns out the seat back isn't as substantial as the base. It's basically an upright mattress, a series of horizontal springs coated in foam with the leather on top. So dismantling it just means I'd end up with a pile of springs and bits of foam that used to be a chair back.

As you can imagine I'm a bit frustrated. I now need to come up with another solution for the seats. However, this could be a good thing. Mainly because I can get things working better for IVA.

The plan now will be to make a metal frame that matches the existing leather skin, with either plywood or metal to fill the gaps. Then new foam to rebuild the seat, then reuse the leather. Sounds fairly simple. I've made a template for the seat back, I'll do the same for the base. Then maybe some thin ply to test fit everything, or even as a permanent solution if the metal frame is solid enough.

Time for more metal though. The stuff I have is too thick for a seat, both in terms of diameter and gauge. I don't want to use metal that can support a fibreglass body, just to hold up a bit of sponge! So I need to work out how much each seat will use, as well as future proofing anything else I might need. Measuring the seat I can see the back is 800 x 400. Assuming that it just needs a single loop on the outside, that's 

    800 + 800 + 400 + 400 (x2 seats) = 4800 mm

Metalstore have 1.2mm gauge x 3 metre x 19mm for £12.78 a length. Two of those should be fine for the seats.

I can also get the metal for the outriggers. With the back panel being 1.5m x 2.5m, I could assume that it basically needs a complete circle of metal for supports. That is 1.5 + 1.5 + 2.5 + 2.5 so an extra 8 metres.

All this is quite fortunate of course, because metalstore have a minimum £50 excl VAT order for free delivery. 5 lengths should do it, and that also works well with the seat metal. 

I could also do with some tube for fixing holes. Just some half inch will do here, 1.2mm again to weld easy. 

Handbrake cables and fitting

 Well, last weekend was a bust due to much higher priorities (more on that later), but hopefully today I'll be able to get started on the handbrake cables. 

The first thing I want to consider is how tight the curve can be on the rear cables. On my car I've mounted the calipers backwards, so instead of routing the cable directly forwards, mine have to loop round. I also have the 'option' of mounting the calipers upside down. While this does cause headaches for bleeding, it may also help the routing of the cables. Whichever way round the brake flexi will always go up, which is easy. The handbrake cable has a mounting bracket that changes the angle depending on orientiation.

I guess the first thing I need to do is try both ways up and see which one gives me the best cable routing without rubbing on the chassis. Then the next question is how tight those cables can bend. This picture suggests they can bend quite sharply;


This appears to be a complete U turn in the length of the lower wishbones, using the standard bracket to fix it on the diff bracket. This would probably be tighter than I need it, but it does mean I have a fair bit of flexibility in the mount. 

The first step is now done. I've replaced the angle fixing brackets that were on the cables with straight brackets, and welded corresponding brackets to the chassis just behind the diff. The cables will route from there to the transmission tunnel, where they will fix into a mounting plate. That's the next step, to create a mounting plate across the tunnel. The cables are intended to clip very similar to flexi pipes, so I've ordered a couple more spring clips. Hopefully I'll get to cutting the brackets once the first step has cooled down.


(Several days later...)

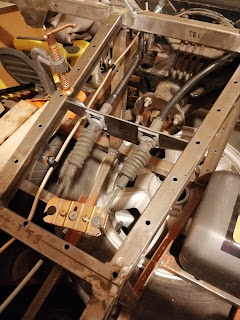
The rest of the handbrake wasn't too painful in the end. Apart from a full week of trying to order some handbrake cable (how can any seller think bungee cord is the same as handbrake cable?!!), I finally managed to figure out the other end. First, a trial fit;


This bracket was the first design, but the handbrake cables are existing too high and rubbing against the chassis. This had to be dropped an inch, to this;


This is the final fit, all welded up with the balance bar in place. This will work fine, so the next part is the front section. It needs to be adjustable, so I spent a while figuring out how to drill through a threaded rod to get this;


Along with a cable clamp at the end, and a nut on the thread, this is my adjustment mechanism;


But at this point it occurred to me that I need the bodywork in place to figure out where the handbrake can go. There's a few places for it to go but it needs to be usable. So for now this is the end of the handbrake. Given that it's two holes and two bolts to fix it in place it shouldn't be too much work.

Next job, seats...