Sunday 20 July 2014

Measuring up the lower wishbones

First step, measuring the length of the rear lower wishbones. A fairly simple process, let the uprights stand vertical, the CV joints sit comfortable (not under tension or compression), then measure from the centre of the bottom fixing to the centre of the wishbone bracket;
And the magic number is 375. So I can compare that to an existing Saturn design;
That shows 395.8 from edge to edge. With a wishbone tube being 33.7mm wide, that means mine are longer at 408.7 from edge to edge. Unfortunately trying to get it down to 395.8 seems to compress the cv joint a bit more than I'd like (and as the suspension moves it will compress even more). I repeated the process on the other side, it actually sits 5mm shorter, but any reasonable amount of camber and the driveshaft binds on the diff.

I also measured up the metal. I have 2490 of tube, and based on the 375mm length, I need 2420 of metal! So no room for mistakes! I'll be using 19mm for the top wishbone, same as the Sierra design. This is because the suspension mount isn't on the wishbone. I'll still brace it a little bit, but at least I won't need the thicker tube.

Saturday 19 July 2014

Driveshafts and uprights

The diff is in place, and the driveshafts, and the uprights. And now I have a problem...

I had planned to fix the coilover alongside the upper fixing of the upright, like the Westfields do;

But with the coilovers at maximum extension (13 inches) the driveshafts are horizontal. Which means as the suspension compresses, the driveshafts will be angled upwards. I don't think this is a good thing. Even comparing to the picture above, I would more expect the driveshafts to be horizontal under full load.

So time for yet another rethink. I may try and mount the coilover top near to the edge, but that would need some reinforcement on the plate.

Mmm, I've just noticed, the uprights are backwards in the Westfield...that could be useful...

(Later that night...)

I've also just noticed that the upper mounts on the Westfield aren't mounted to the upper plates, they're mounted to the cross member. The hole for putting the bolt in is actually in the back seat panel. The plate is only used for the rollbar. So I'm thinking, if I reverse the uprights, mount the coilover as per Westfield, it would be mounted an inch or so down and out so the shorter shock wouldn't matter anymore. There's a little bit of bracing added, I can do the same.

Looks like I have a few things to try out tomorrow! :)

More diff...

I treated myself to some new welding gloves, mainly because the right index finger was so burnt it bent sideways instead of inline with the knuckle... anyway, long story short, turns out it's the way I hold the torch as I weld, because the new pair did exactly the same thing after welding the diff brackets!

Anyway, on to the diff.
Once the upper bar was fitted, I used offcuts of the old Sierra diff plates that I had from a guy on LCB. He was getting rid of a nearly complete set of plates, a few bob for postage and a bit extra and they were mine. Obviously the Sierra plates were never going to be used, but the holes were the right size and it's thick enough metal. A quick trim and the brackets were produced. Note the bottom left one in the picture, that's to avoid what was the PPF bracket on the diff.

The diff seems to fit quite well;


Obviously the diff is mounted centrally according to the driveshaft flanges rather than the propshaft. I was always going to have a 'wonky' propshaft as the diff isn't centred. This wasn't going to bother me, I just had to make sure that the prop had enough clearance;

Yep, looking good to me. The more observant of readers might notice this 'after' pic only shows the tack welds, rather than the full welds of the 'before' pic above. That's because this was me trialing the diff fit before fully welding.

So once the plates have cooled down, I can bolt the diff in place and then mount the driveshafts and uprights. Then I can figure out how things will fit together!

It's nice to make some progress though... although looking at the picture above that propshaft really needs cleaning. It's got to be cut to length anyway so I'll get them to check the bearings at the same time.

Tuesday 15 July 2014

Rear suspension

I keep putting it off because I just know it's going to be a nightmare. The whole thing is going to be a mishmash of all books, and plenty of scope for mistakes. I'm even changing the upper wishbone completely, just to make it fit better and get the loads flowing in the right directions.

So, first thing, mount the diff. And it's not a light diff either;


At least I'm going back to the gym so getting in and out is getting easier!! By the way, it probably looks a bit different to a standard diff, it's got the Talon diff cover, then two coats of red oxide primer, then two coats of satin black top coat.

I should actually mention that nothing on my car will be powdercoated, I do like the look of it but I've come to the conclusion that whatever I do, it's going to need repairing, and powdercoat doesn't repair!

So, first step, lower and upper braces for the diff;


(upper to be added, erm, when I get round to fitting it!!)

How time flies!!

Well, I finally got the wishbones finished, I reckon at least 20 hours labour start to finish for all four front wishbones.

Same as before, start with a layout;


And end up with a wishbone!


OK, I skipped a fair bit of effort, and this is only at the tack stage, but to be honest the uppers did go together a lot quicker than the lowers. Again, there's a gnats hair difference between the two.

I had some old tube to hang them all from, so first was two coats of Screwfix red oxide primer;


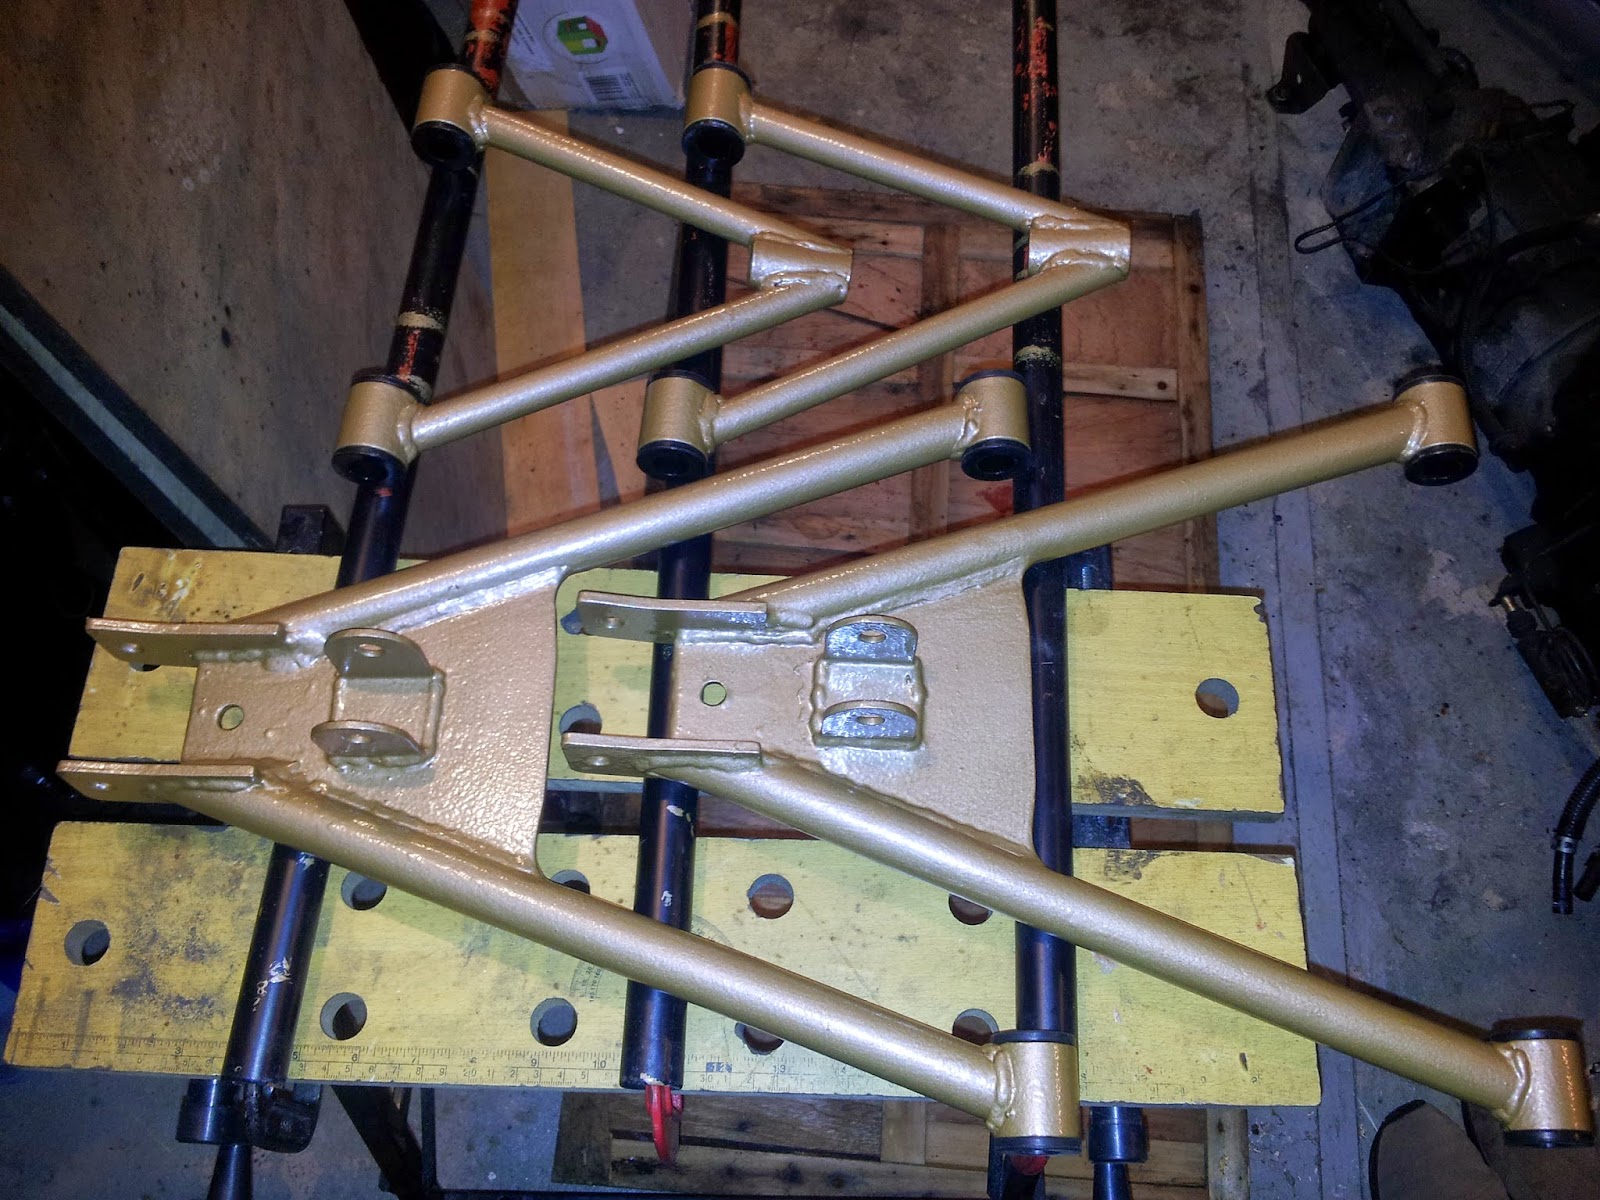
Then two coats of hammerite copper;


And then fit the polybushes (I didn't need to do this stage, but it felt good to see them slot in perfectly!)


I also got all the front brackets fitted. To be honest, I expected this bit to be much harder than it was, but thanks to the advice of Phil from Talon my front frame had been welded up to host the brackets from the start. Everything just fell together, face against face and welded perfect.


Note the reinforcement behind the front upper wishbone bracket. It's just a triangular chunk of square section welded up, not overly pretty but it gives me confidence that it will stay put!


I do like some of my welding, although other parts are a bit messy. They've all got very good penetration, almost too much in some places.


The wishbones fit beautifully into the brackets, and the coilover bracket is perfectly in line. Very very happy with the front suspension. On to the rear.... again...